0
HelloWorld BPEL Process with ODE and Eclipse BPEL Designer - Windows
I have been in doing some projects in BPEL for my studies. But when i want to find information, it's really hard to find any tutorials regarding BPEL process in Apache ODE and Eclipse BPEL designer. So i thought to provide a step by step guide on various BPEL construct. This is the first blog post about BPEL. I will write some other post later on setting up the environment.
Our "HelloBPEL" process get "Name"(String) as an input and return the Greeting to with the name(String).
Steps
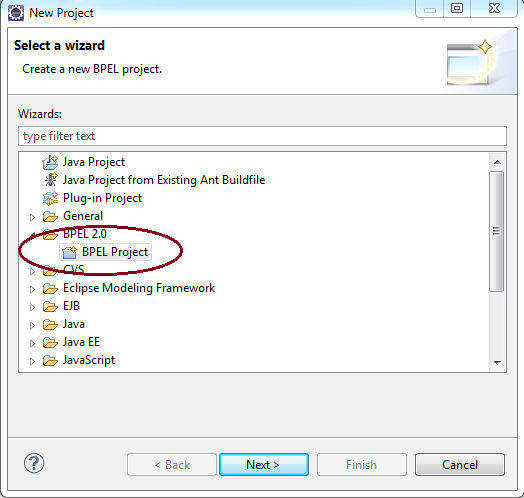
1. Create a BPEL Process. File -> New -> Project -> Other -> BPEL2.0 -> BPEL Project.


13. By default it shows Variable selected for From and Variable selected for To ( If we just want to return the string we get , we can use this)


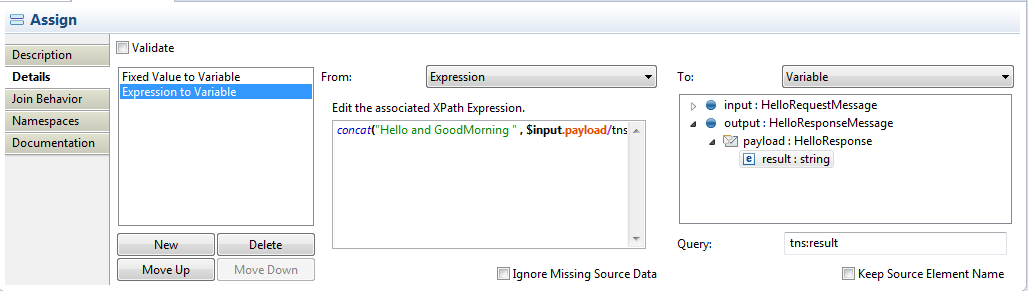
14. Write the following Xpath Expression -{ concat("Hello and GoodMorning " , $input.payload/tns:input) } and Select Output->Payload->result for the To:
Once you select the output and click on the bpel file , a window pop up and ask to click yes to initialize variable, click yes.

Your Assign Details property should be some thing like following.
by this time there is another file added to the project folder - don't care about it.
15. We need to add a deployment descriptor to the folder. Right click the folder bpelContent and New -> Other -> BPEL2.0 -> BPEL Deploymenr Descriptor


18. Now time to change the service address ( you can do it initially as well)
open the WSDL file in design view and click on the HelloService -> "HelloPort" and in the properties window, change the Address to "http://localhost:8080/ode/processes/Hello" - if your local host- tomcat running on port 8080.


19. Now click o the binding and in the Properties -> General tab click "Generate Binding Conte.." button, and check Over write Existing binding information and finish.


Our "HelloBPEL" process get "Name"(String) as an input and return the Greeting to with the name(String).
Steps
1. Create a BPEL Process. File -> New -> Project -> Other -> BPEL2.0 -> BPEL Project.
2. Click Next and Name the project as "HelloBPEL" & select the Target Run time as Apche ODE and select the default configuration.
3. Project created and there is folder called bpelContent also created. No more files created.
4. Right click the folder bpelContent and New -> Other -> BPEL2.0 -> BPEL Process File.
5. Click Next, and Select "Create a BPEL process from a template" and give process name "Hello" and Namespace as your wish - "http://hello.com" and click Next
6. Now Select the Synchronous BPEL process as the template and other details are fetched by the Eclipse .
Actually the Service address have to be pointed to the address where the BPEL have to be deployed. For example - http://localhost:8080/ode/processes/Hello We can configure here, But we need to do it again. So let it be same.
and click Next, and then Finish in the other window.
7. Now your bpelContent folder would have two files, one bpel file - Hello.bpel, and one WSDL file - HelloArtifacts.wsdl
8. Initial bpel process looks like following.
You can see the bpel process recieveInput and finally replyOutput. We need to include our logic inbetween those two construct.
9. Now we need to implement the logic, You can find a pallet in right side of the eclipse - where you can find all bpel construct.
10. Our logic is get the Name - String input and give back greeting with Name - String as a out.
Since our inputs & outputs are String & by default bpel set the input and output type as string we don't need to touch the HelloArtifacts.wsdl file. Else we need to change the type - or even we need to add more inputs or out puts. If you double click the HelloArtifacts.wsdl file you will get the designer view of the WSDL.
You can see the first diagram shows the input & output. If click either one arrow i marked you get the specific input/output and the name of the input & types. Here the name - identifier of the input is input and type is string
11. Now go back to the bpel file, We need t get the input and add(concat in programming world) some greeting - "Hello and GoodMorning" and send it to out put. Our task is to assign the input to output with some concatination, we need to use Assign bpel construct. Delete the construct between the recieveInput and replyOutput & Drag and drop Assign in.
you can see some thing missing / error in the Assign - If anything not configured or incorrectly configured the bpel designer shows red cross in the construct. ( but please keep in mind the Eclipse bpel designer is buggy one - some times the errors it shows are not really errors)
12. Click on the Assign and go to properties and Details tab on the properties. you can see there is nothing configured - Assigned. -> Click on the New button.
But Since we need to concat some string to input select Expressing (XPath) , the box bellow will be empty. We need to write the Expression there to concat the string with input.
14. Write the following Xpath Expression -{ concat("Hello and GoodMorning " , $input.payload/tns:input) } and Select Output->Payload->result for the To:
Once you select the output and click on the bpel file , a window pop up and ask to click yes to initialize variable, click yes.
Your Assign Details property should be some thing like following.
by this time there is another file added to the project folder - don't care about it.
Now time to Deploy.
15. We need to add a deployment descriptor to the folder. Right click the folder bpelContent and New -> Other -> BPEL2.0 -> BPEL Deploymenr Descriptor
16. Click next and click finish. Following file will be added and opened.
17. You can see under Associated Port and Related Service "none" selected. Click on "--none--" under Associated Port and select "HelloPort" - only one present there. and click on the "--none--" under the Related Service - It' will change the values according to your previous selection.
18. Now time to change the service address ( you can do it initially as well)
open the WSDL file in design view and click on the HelloService -> "HelloPort" and in the properties window, change the Address to "http://localhost:8080/ode/processes/Hello" - if your local host- tomcat running on port 8080.
19. Now click o the binding and in the Properties -> General tab click "Generate Binding Conte.." button, and check Over write Existing binding information and finish.
20. We are almost there , time to deploy. Right click on the ODE and Add/Remove project and select the HelloBPEL process and Add and finish. your process should be deployed and ready to test.
If you find any problem deploying in ODE through Eclipse. you can do in a different way, if your Tomcat running as a windows service.
Go to 'http://localhost:8080/ode/" and click on Deployment Tab and upload the zip file that contain all the files under bpelContent folder.
21. Now time to test the BPEL process we deployed. Right click on the HellpArtifact.wsdl and -> WebServices-> Test with Webservice Explorer . (it's a way to test the web services in Eclipse)
write the input to the input and click Go, You can see Hello and Good Moring + "the string you wrote"
Finally we done it, But it's a long post since it's first post on bpel , i tried to explain things in more details. But coming post won't be with much details on the stuff that are repeating again again.( Examples 1.Create Project 2. Add bpelProcess, 3. ,,,)
I hope this is helpful to you. :)


